TABLE OF CONTENTS
Case Notes
This article describes how to add a 'freestanding' case note. That is, a note that is not connected to a particular service. See the article Simple and Elaborate Services to learn about adding notes in a way that associates them to a particular service.
Add a Case Note

To add a Case Note to a case, use the following steps:
- Navigate to the case you would like to add the note to
- In the Case Profile Sidebar:
- Click Case Actions to expand the Case Actions list
- Click Add Case Note
- Fill out the fields on the Add Note form:
- Note Type - Select the Note Type from the list of options. This field is mainly used to organize notes but can also be in combination with Roles & Permissions to restrict access to certain note types.
- Color Scheme - Select the color of the note box.
- Subject - Enter a brief synopsis of the topic of the note.
- Date/Time Posted - Enter the date and time you are entering the note. Notes appear in chronological order based on the values entered in this field.
- Body - Enter narrative of note
- Click Choose Recipient and enter and select user's name you wish to notify, if you would like to send email notification of the note.
- Click Attach Document if you wish to attach a document to the note you are creating.
- For more information on attaching documents, please refer to Managing Documents.
- Once you are finished, Click Continue to save the note and take you back to the case profile.

Edit Case Note
To edit an existing note, use the following steps:
- Navigate to the case which contains the Case Note you would like to edit.
- Scroll down, find the Case Notes listview.
- Click View in the Note Header for the note you want to edit.
- On the View Note form, click Edit Note under the Note Actions header.
- Edit any of the fields on the note form.
- Click Continue to save your edits.
Delete Case Note
To delete an existing note, use the following steps:
- Navigate to the case which contains the Case Note you would like to delete.
- Scroll down, find the Case Notes listview.
- Click Delete/Transfer in the Note Header for the note you want to delete.
- Enter a reason for deleting the note.
- Click Delete Note
- Confirm that you wish to delete the note by clicking Yes
Transfer Case Note
To transfer an existing note to another case, use the following steps:
- Navigate to the case which contains the Case Note you would like to transfer.
- Scroll down, find the Case Notes listview.
- Click Delete/Transfer in the Note Header for the note you want to transfer.
- In the Transfer Note form:
- Transfer to... - Search for the case you wish to transfer the note to
- Reason for transferring - Enter the reason you are transferring the note.
- Click Transfer This Note
Manage Documents
Use the Manage Documents link to upload and attach documents from your computer to a Case.
NOTE: There is no file type restriction on uploading documents into Collaborate. There is no file limit per case. However, there is a file size limit of 100MB per upload.

Upload a Document
There are two methods to upload a document into Collaborate. You can utilize the Manage Documents link within the Sidebar under Case Actions. Alternatively, you can 'drag and drop' a file from your desktop into the folder within the Documents tab of the case. Both methods are described here:
Via Manage Documents Link

Select Manage Documents from the sidebar within the Case Actions section. On the following page, enter the following information:
- The Document's Title
- The Document Type: This setting is for convenience of categorizing the document. It is also used in some situations in conjunction with permissions to delegate who is allowed to view and download the document. (Example: Many organizations have a Document Type of 'Mental Health' to specify that only those users are specified in Collaborate as Mental Health providers are allowed to view the document.)
- Select the file from your computer by clicking Browse.
- Enter a brief description of the document that is being uploaded. This setting is for convenience for easier referencing later.
- Select Upload and Add Another if you wish to upload the current document and then immediately upload another document.
- Select Continue if you wish to upload the current document and then return to the case's profile page.
Via Drag & Drop

To 'Drag and Drop' a file to Collaborate. Simply click and drag the icon of the document FROM your desktop TO the folder within the Documents tab of the case's profile page. You may choose to simply upload the document to the root folder--in the example above, 'Simpson, Lisa'). Or you may choose to upload it to a subfolder--in the example above, 'Consent Forms'.
NOTE: Using the 'Drag and Drop' method will apply basic settings to the document. If the document uploaded via this method needs special settings, be sure to edit the document after it is uploaded.
Download a Document

To download a document, navigate to the Documents tab on the case's profile page and select the corresponding download icon. Alternatively, you can select the name of the document and on the following page select Download this Document from the Actions section within the sidebar.
Edit Existing Document Settings

To edit a document, navigate to the Documents tab on the case's profile page and select the name of the document you wish to edit. On the following page select Edit this Document from the Actions section within the sidebar.
Make any necessary updates. Once completed, select Continue to save the changes.
Managing Folders
Add New Sub-folder
To add a sub-folder, navigate to the Documents tab on the case's profile page. Select the add sub-folder icon (folder with a plus '+' sign) next to the existing folder you wish to create the new sub-folder within. Then, enter the name of the sub-folder. The newly created sub-folder will appear by clicking the expand/collapse 'triangle' icon next to the parent folder.
Edit Existing Sub-folder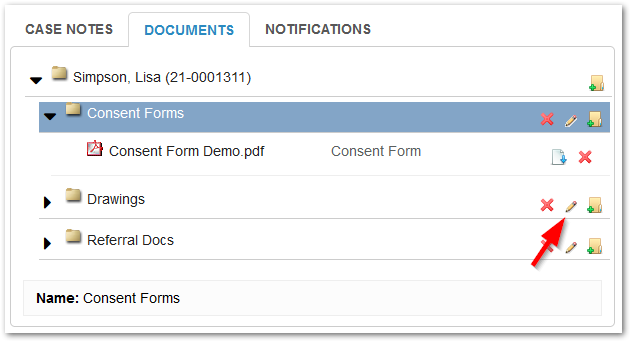
To edit the name of an existing sub-folder, navigate to the Documents tab on the case's profile page. Select the edit 'Pencil' icon next to the folder you wish to edit. Then, enter the updated name of the sub-folder.
Delete Sub-folder
NOTE: This functionality is usually limited to Site and Network Administrators. If you receive a 'You do not have permission...' message when attempting to delete a folder, contact your Site or Network Administrator for further assistance.

Proceed with Caution! Deleting a sub-folder will also automatically delete all documents and sub-folders within it. This can not be undone.
To delete a sub-folder, navigate to the Documents tab on the case's profile page. Select the delete sub-folder icon ('X' sign) next to the existing folder you wish to delete.
Delete Document
NOTE: This functionality is usually limited to Site and Network Administrators. If you receive a 'You do not have permission...' message when attempting to delete a document, contact your Site or Network Administrator for further assistance.

Proceed with Caution! Deleting a document can not be undone.
To delete a document, navigate to the Documents tab on the case's profile page. Select the delete document icon ('X' sign) next to the existing document you wish to delete. Alternatively, you can select the name of the document and on the following page select Delete this Document from the Actions section within the sidebar.
See Also: